Expenses
With the expenses module enabled your staff will be able to upload their expenses into Work Tyme from anywhere in the world and your admins and expense admins (see user types for more information) will be able to instantaneously review and download expense reports. No more bundles of receipts being dropped off on the accountant’s desk two weeks after the cut-off date.
Enable/Disable expense tracking
Expense tracking is disabled by default. To enable or disable expense tracking visit the company settings page and adjust the setting.
Managing company cards
The first step in setting up your expense tracking module is adding in the company’s credit cards (or any other type of cards) into your Work Tyme account and assigning them to the individuals who will be using them. This way when an employee is entering an expense they can assign the expense to the list of cards that have been assigned to them.
To manage your company cards you must be an admin or expense admin. Click on the menu option titled “Administration” and then “Company cards”.
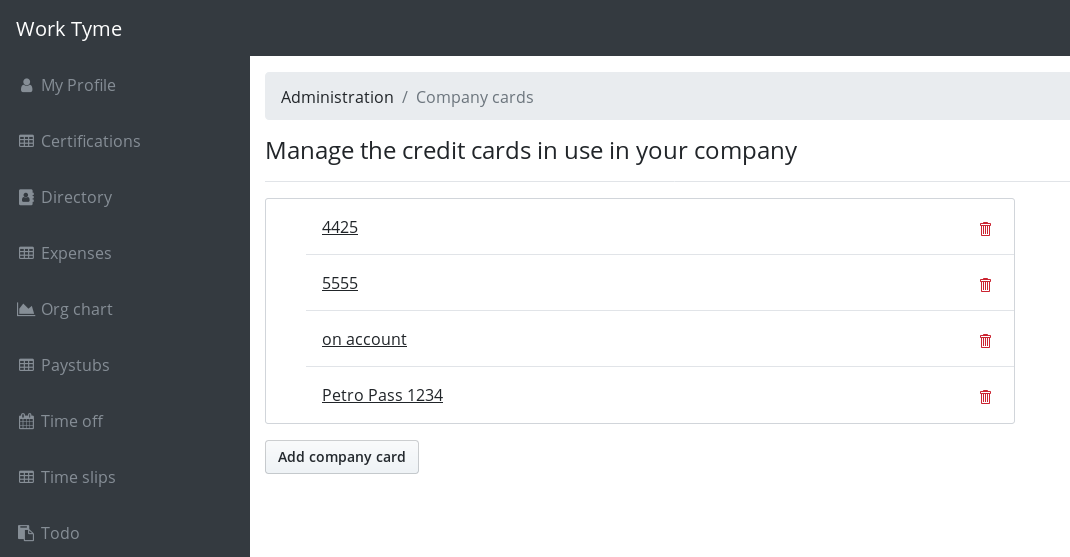
To add a new company card click on the button titled “Add company card” and enter in a description. You can enter anything but we suggest just using the last four digits of the credit card when possible.
Add an expense
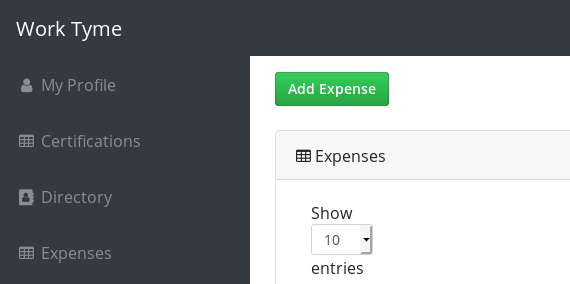
There are two ways to add an expense; either by using the mobile app or via the web portal. To see the steps when using the mobile app click here. What follows are the steps to add an expense from the web portal.
To add an expense with the web portal first click on the menu item called “Expenses”. At the top left of the page you will find a green button called “Add Expense”. Click on this button to be taken to the add expense screen.
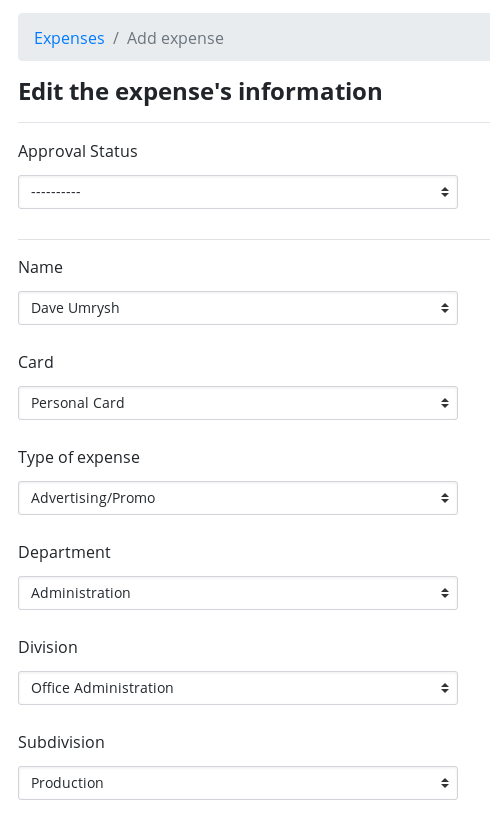
The fields will be slightly different depending on if your account is an Expense Admin (see user types for more information).
- Approval Status: This field is only shown if you are an Expense admin. It allows you to change the current status of the expense from “new” or “locked”
- Name: If you are an Expense Admin you will be able to select any employee in your company. If you are not an Expense Admin this will be locked to your own name
- Card: Select from the list of cards that are assigned to you. If you are an Expense Admin you will be able to select any card in the company. This is the card that the expense has been placed. All employees have an option called “Personal Card” for expenses they will need to be reimbursed for
- Type of expense: Select from a list of expense types to better classify the expense. This list is not configurable. If you require an option added to the list please let us know
- Department: Select the company department to which this expense was incurred
- Division: Select the company division to which this expense was incurred
- Subdivision: Select the company subdivision to which this expense was incurred
- Currency: Select either “CA” for Canada or “US” for United States.
- Date: Select the date the expense was incurred
- Supplier: Type in the name of the supplier for the purchased product/service
- Description: Add a short description about the expense
- Sub total: You must either enter a sub-total or a Total for the expense
- Tip: If a tip was paid on the expense enter it here
- Taxes: Enter any taxes incurred
- Total: You must either enter a sub-total or a Total for the expense
- Attach a file: Click the entry box to open a file selector window and select a PDF copy of the receipt.
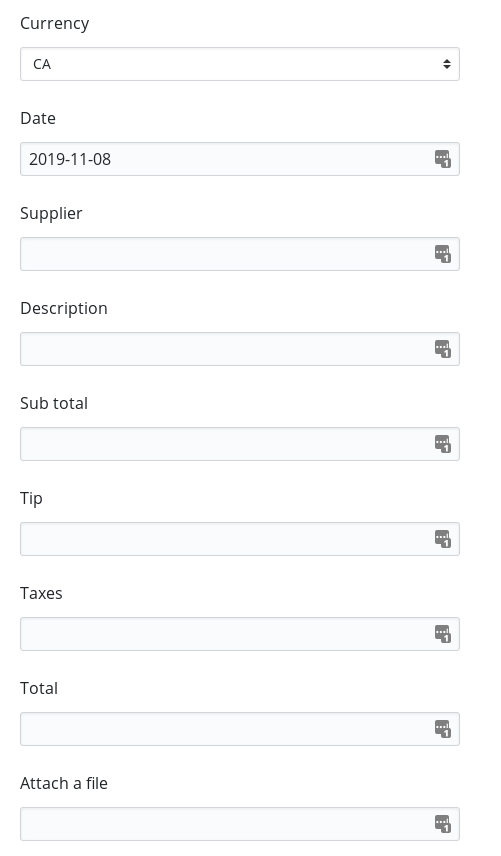
Lastly, click on the button titled “Save expense” to save the expense into Work Tyme.
View expenses
To view expenses with the web portal first click on the menu item called “Expenses”. You will be shown a page with a table listing all currently unprocessed expenses. If you are an Expense admin (see user types for more information) you will see all the expenses in the entire company. If you are not an Expense Admin you will instead be shown just your own uploaded expenses.
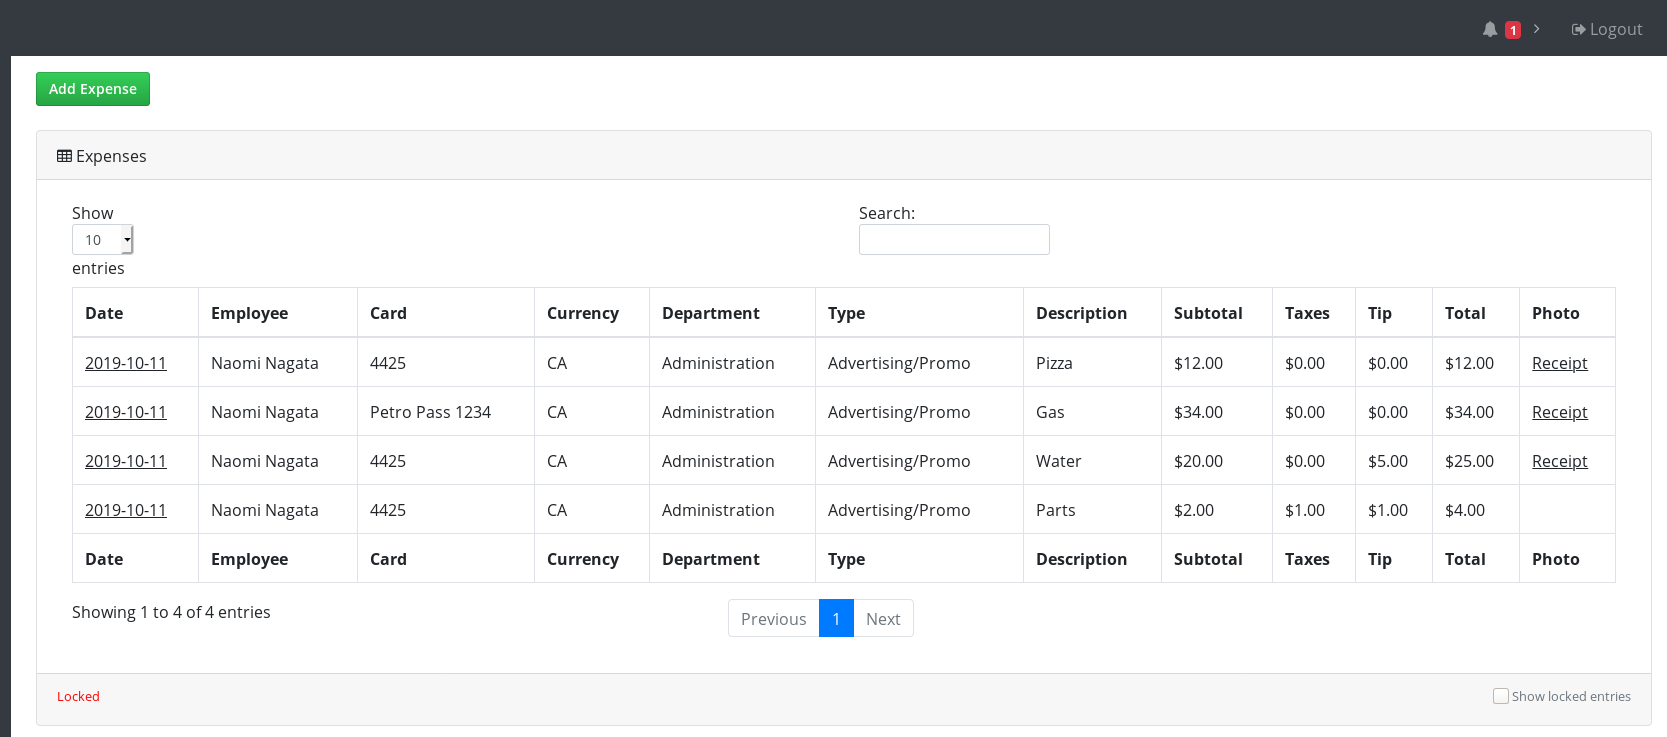
To view expenses that have already been exported by an Expense Admin click on the checkbox titled “Show locked entries” underneath the bottom right corner of the table. Locked entries will be highlighted in red.
Edit uploaded expenses
To edit an expense with the web portal first click on the menu item called “Expenses”. Find the expense in the table by either paging through the table or using the search box. If the expense has already been exported by an Expense Admin you will need to check the box below the right hand side of the table titled “Show locked entries”. If you are not an Expense Admin you will only be able to edit unlocked expenses.
To open the expense for editing click on the underlined date in it’s row in the table.
The fields will be slightly different depending on if your account is an Expense Admin (see user types for more information).
- Approval Status: This field is only shown if you are an Expense admin. It allows you to change the current status of the expense from “new” or “locked”
- Last edited by: This field is only shown if you are an Expense admin. It shows the name of the last Expense Admin who made a change to this expense
- Editor notes: This field is only shown if you are an Expense admin. It allows Expense Admins to leave notes as to what they had to modify the last time they edited the expense
- Name: If you are an Expense Admin you will be able to select any employee in your company. If you are not an Expense Admin this will be locked to your own name
- Card: Select from the list of cards that are assigned to you. If you are an Expense Admin you will be able to select any card in the company. This is the card that the expense has been placed. All employees have an option called “Personal Card” for expenses they will need to be reimbursed for
- Type of expense: Select from a list of expense types to better classify the expense. This list is not configurable. If you require an option added to the list please let us know
- Department: Select the company department to which this expense was incurred
- Division: Select the company division to which this expense was incurred
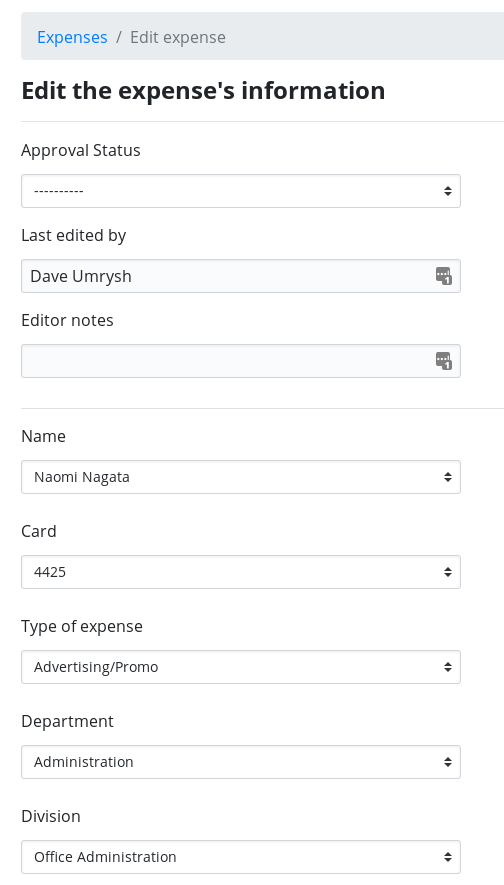
- Subdivision: Select the company subdivision to which this expense was incurred
- Currency: Select either “CA” for Canada or “US” for United States.
- Date: Select the date the expense was incurred
- Supplier: Type in the name of the supplier for the purchased product/service
- Description: Add a short description about the expense
- Sub total: You must either enter a sub-total or a Total for the expense
- Tip: If a tip was paid on the expense enter it here
- Taxes: Enter any taxes incurred
- Total: You must either enter a sub-total or a Total for the expense
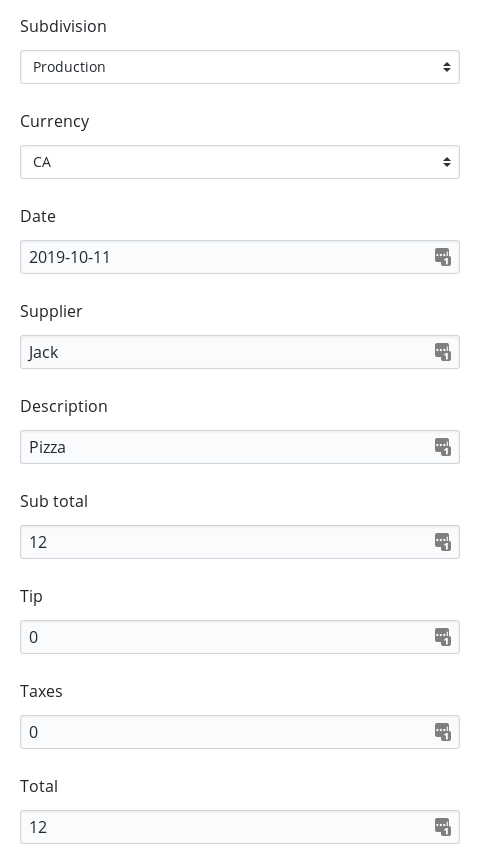
- Replace uploaded file: Click the entry box to open a file selector window and select a PDF copy of the receipt. The uploaded document will replace any previously stored documents attached to this expense
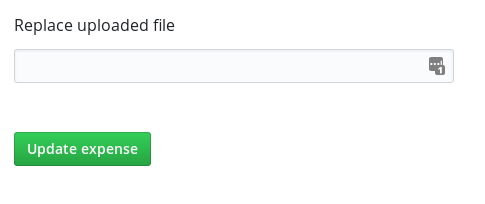
Lastly, click on the button titled “Save expense” to save the expense into Work Tyme.
Download expense reports
In order to download expense reports you must either be an admin or an expense admin (see user types for more information). When you view the expenses page as one of these two types of users there will be a reports section located directly below the expenses table.
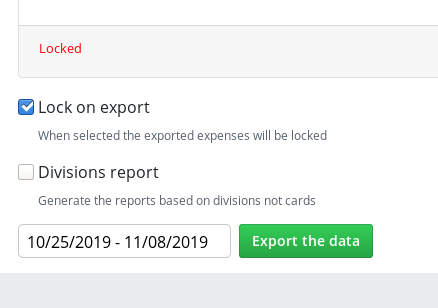
There are a couple options you can select when generation your report:
- Lock on export: If you wish to lock the expenses from being edited by non-admins after you generate this report.
- Divisions report: Rather then have the downloaded excel files be split based on the company card you instead would like the files split by company divisions. This way giving you a total of all expenses incurred for each division.
Lastly select the data range of expenses you would like to download and click on the “Export the data” button.
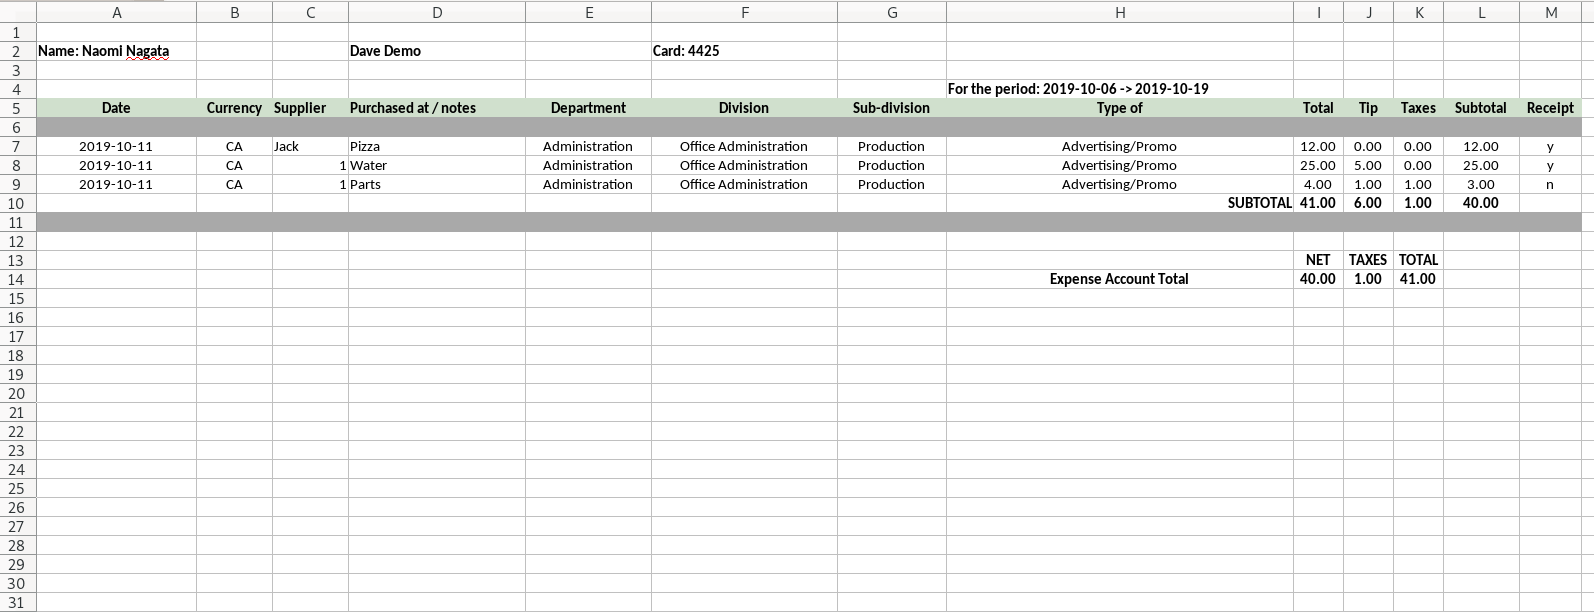
Example of a regular expense report:
Example of a Divisions report:

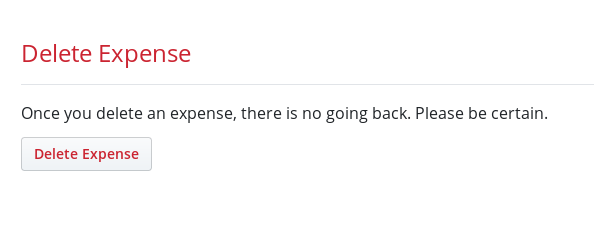
Delete an expense
To delete an expense first click on the menu item called “Expenses”. Find the expense in the table by either paging through the table or using the search box. If the expense has already been exported by an Expense Admin you will need to check the box below the right hand side of the table titled “Show locked entries”. If you are not an Expense Admin you will only be able to delete unlocked expenses.
To open the expense click on the underlined date in it’s row in the table.
Once you have the expense opened scroll down to the very bottom of the page to find the delete button. Click on the “Delete Expense” button to remove this expense from your Work Tyme account.