Expenses in the apps
If you have enabled the expense tracking module your users will gain access to the ability to upload expenses from within the mobile app.
Please note you must have an Internet connection to add an expense with the mobile app
The workflow of adding expenses from the Work Tyme mobile app will be different based on whether the logged in user is either a regular employee user or is an “Expenses Only” user (see user types for more information).
Regular employees
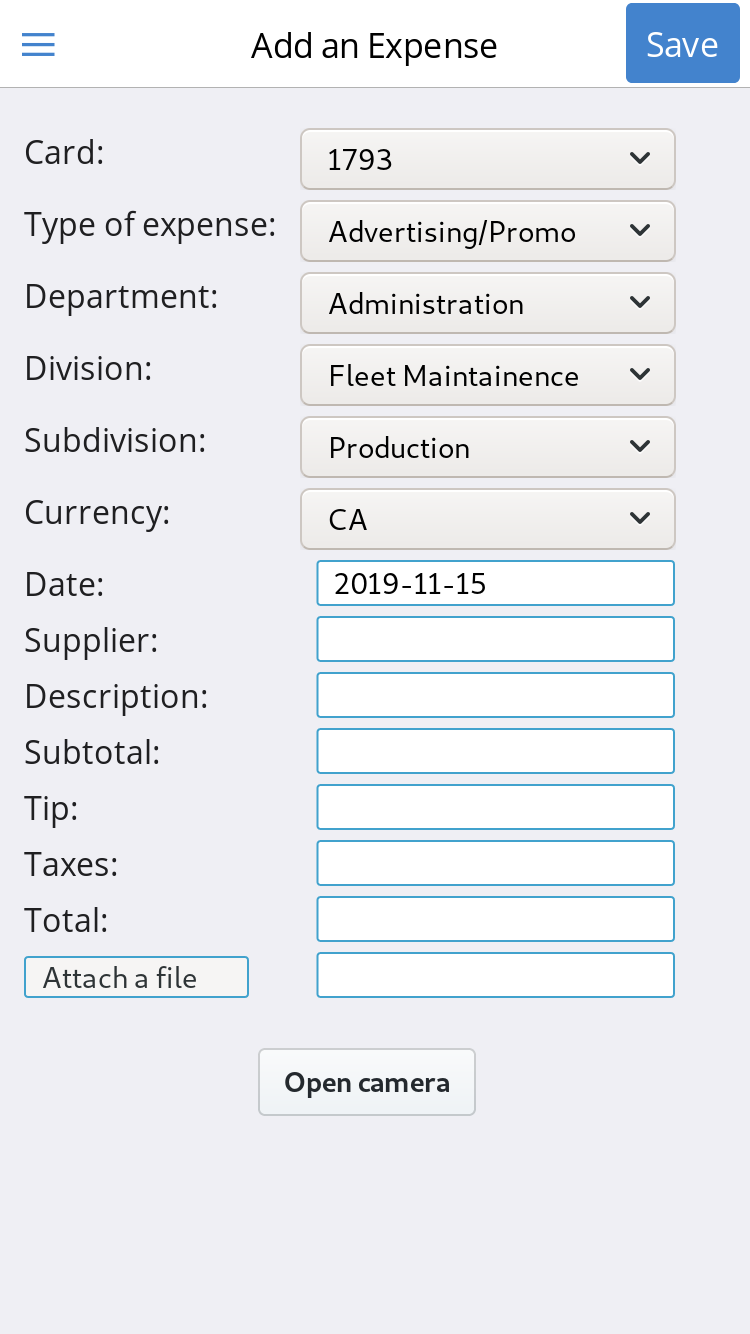
Add an expense
When a regular employee opens the mobile app they are presented with the time slips screen as their home page. To add an expense open the app menu by using the three horizontal lines on the top left of the screen and click on “Add Expense”. You will be taken to the add expense screen which looks like the following:

- Card: Select from the list of cards that are assigned to you. If you are an Expense Admin you will be able to select any card in the company. This is the card that the expense has been placed. All employees have an option called “Personal Card” for expenses they will need to be reimbursed for
- Type of expense: Select from a list of expense types to better classify the expense. This list is not configurable. If you require an option added to the list please let us know
- Department: Select the company department to which this expense was incurred
- Division: Select the company division to which this expense was incurred
- Subdivision: Select the company subdivision to which this expense was incurred
- Currency: Select either “CA” for Canada or “US” for United States.
- Date: Select the date the expense was incurred
- Supplier: Type in the name of the supplier for the purchased product/service
- Description: Add a short description about the expense
- Sub total: You must either enter a sub-total or a Total for the expense
- Tip: If a tip was paid on the expense enter it here
- Taxes: Enter any taxes incurred
- Total: You must either enter a sub-total or a Total for the expense
- Attach a file: Click the “Attach a file” button to open a file selector window and select a PDF copy of the receipt.
- Open camera: Instead of using the “Attach a file” button you can choose to take a photo of the reciept using your phones camera. Click on this button to open the camera and once you are happy with what you are seeing in the prevew window click on the “Take a photo of the receipt” button to save the image.
You are only allowed to take a photo or upload a file. You cannot do both
After you have finished adding in all the information click on the “Save” button at the top right to save your expense.
Expense Only accounts
Add an expense
When an expense only user opens the mobile app they are presented with the “Add an Expense” screen as their home page which looks like the following:
- Card: Select from the list of cards that are assigned to you. This is the card that the expense has been placed. All users have an option called “Personal Card” for expenses they will need to be reimbursed for
- Type of expense: Select from a list of expense types to better classify the expense. This list is not configurable. If you require an option added to the list please let us know
- Department: Select the company department to which this expense was incurred
- Division: Select the company division to which this expense was incurred
- Subdivision: Select the company subdivision to which this expense was incurred
- Currency: Select either “CA” for Canada or “US” for United States.
- Date: Select the date the expense was incurred
- Supplier: Type in the name of the supplier for the purchased product/service
- Description: Add a short description about the expense
- Sub total: You must either enter a sub-total or a Total for the expense
- Tip: If a tip was paid on the expense enter it here
- Taxes: Enter any taxes incurred
- Total: You must either enter a sub-total or a Total for the expense
- Attach a file: Click the “Attach a file” button to open a file selector window and select a PDF copy of the receipt.
- Open camera: Instead of using the “Attach a file” button you can choose to take a photo of the reciept using your phones camera. Click on this button to open the camera and once you are happy with what you are seeing in the prevew window click on the “Take a photo of the receipt” button to save the image.
You are only allowed to take a photo or upload a file. You cannot do both
After you have finished adding in all the information click on the “Save” button at the top right to save your expense.